10 Project Export
Export means creating (and saving on a disk) an UDO script describing the project, which is interpreted by QW-Editor.
All QuickWave objects defined in the project will be exported to QuickWave, however not all geometrical objects will be exported. See Exported Objects chapter for more information.
Geometrical objects are exported using sections (XY plane cross-sections through geometrical object at all the mesh levels in Z-direction). See Sections chapter for more information.
The effective and practically useful solution for simulation convergence monitoring can be configured using Energy Stop Criterion. See Energy Stop Criterion chapter for more information.
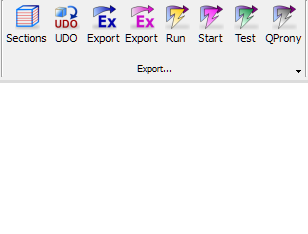
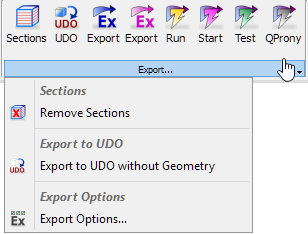
The Export action can be initiated using commands from Export section in the Simulation tab.
![]() - creates and visualises Sections (XY plane cross-sections through all geometrical objects at all mesh levels in Z direction). See Sections chapter for more information.
- creates and visualises Sections (XY plane cross-sections through all geometrical objects at all mesh levels in Z direction). See Sections chapter for more information.
![]() - exports current project to UDO file.
- exports current project to UDO file.
![]() - exports current project to UDO file, run QW-Editor and create QW-Editor project (*.pro) from the exported UDO.
- exports current project to UDO file, run QW-Editor and create QW-Editor project (*.pro) from the exported UDO.
![]() - removes all existing Sections. See Sections chapter for more information.
- removes all existing Sections. See Sections chapter for more information.
![]() - exports current project, except the geometry, to UDO file.
- exports current project, except the geometry, to UDO file.
![]() - opens Export Options dialogue with options for export action configuration. See Export Options chapter for more information.
- opens Export Options dialogue with options for export action configuration. See Export Options chapter for more information.
It is also possible to run the simulations directly from QW-Modeller by invoking the commands:
· ![]() - exports current project to UDO file, run QW-Editor, create QW-Editor project (*.pro) from the exported UDO and export the project to QW-Simulator
- exports current project to UDO file, run QW-Editor, create QW-Editor project (*.pro) from the exported UDO and export the project to QW-Simulator
· ![]() - exports current project to UDO file, run QW-Editor, create QW-Editor project (*.pro) from the exported UDO, export the project to QW-Simulator and run QW-Simulator
- exports current project to UDO file, run QW-Editor, create QW-Editor project (*.pro) from the exported UDO, export the project to QW-Simulator and run QW-Simulator
· ![]() - exports current project to UDO file, run QW-Editor, create QW-Editor project (*.pro) from the exported UDO, export the project to QW-Simulator, run QW-Simulator and start simulation
- exports current project to UDO file, run QW-Editor, create QW-Editor project (*.pro) from the exported UDO, export the project to QW-Simulator, run QW-Simulator and start simulation
· ![]() - exports current project to UDO file, run QW-Editor, create QW-Editor project (*.pro) from the exported UDO, export the project to QW-Simulator, run QW-Simulator and open Test Mesh window
- exports current project to UDO file, run QW-Editor, create QW-Editor project (*.pro) from the exported UDO, export the project to QW-Simulator, run QW-Simulator and open Test Mesh window
· ![]() - exports current project to UDO file, run QW-Editor, create QW-Editor project (*.pro) from the exported UDO, export the project to QW-Simulator, run QW-Simulator and start simulation using QProny module (see QProny chapter for more information)
- exports current project to UDO file, run QW-Editor, create QW-Editor project (*.pro) from the exported UDO, export the project to QW-Simulator, run QW-Simulator and start simulation using QProny module (see QProny chapter for more information)